Java Microbenchmark Harness (JMH) is a Java library used to measure the performance of Java code snippets, methods, and classes. It is a useful tool for developers who want to optimize their Java applications, identify performance bottlenecks, and compare the performance of different implementations.
JMH provides a simple API for developers to write benchmarks and test their performance. In this blog post, we will explore the basics of JMH and how to write and run benchmarks using JMH.
What is a Benchmark Harness:
A benchmark harness is a software that provides the infrastructure to conduct benchmarks of a software and/or hardware system, typically with the goal to quantitatively assess the system’s characteristics and capabilities or to compare the characteristics and capabilities of multiple systems relative to each other
What is JMH:
JMH is built on top of the Java Virtual Machine’s (JVM) HotSpot compiler infrastructure. It uses the Just-In-Time (JIT) compiler to optimize code at runtime, which means that the code is executed multiple times before the actual benchmark is run. This ensures that the benchmark results are accurate and consistent.
To achieve this, JMH generates a benchmarking harness that consists of a loop that executes the benchmark method multiple times. This loop is called a “measurement iteration” and it is executed several times to ensure that the benchmark results are reliable.
JMH Execution Lifecyle
we’ll explore the different phases of the JMH execution lifecycle and what happens during each phase.
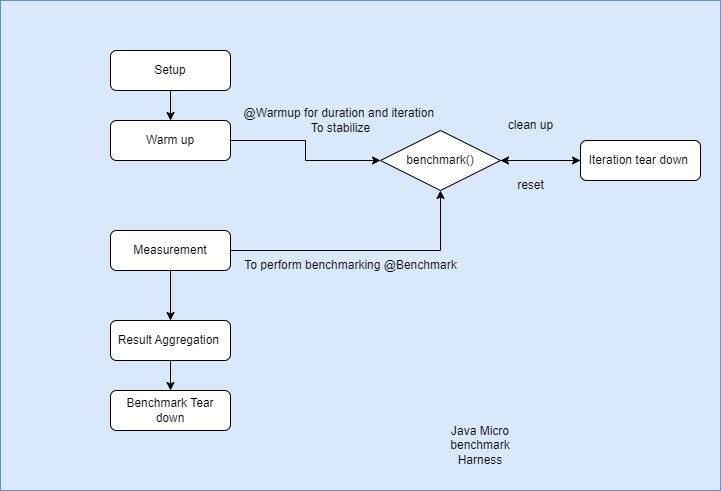
Fig: JMH
Setup Phase
The first phase of the JMH execution lifecycle is the setup phase. During this phase, JMH initializes the benchmark state and sets up the environment for the benchmark. The @Setup annotation can be used to define a method that will be executed during this phase.
Warmup Phase
The next phase is the warmup phase. During this phase, JMH runs the benchmark method multiple times to allow the JVM to warm up and optimize the code. The @Warmup annotation can be used to control the duration of the warmup phase and the number of iterations to run.
Measurement Phase
The measurement phase is the main benchmarking phase. During this phase, JMH measures the performance of the benchmark method. The @Benchmark annotation is used to mark the method to be benchmarked. JMH runs the benchmark method for a configurable number of iterations and measures the execution time of each iteration.
Iteration Tear Down Phase
After each iteration of the benchmark method, JMH executes any methods annotated with @TearDownIteration. This can be used to clean up any resources or reset the state of the benchmark.
Result Aggregation Phase
After all iterations have completed, JMH aggregates the results and computes statistics such as the mean, standard deviation, and confidence intervals. This provides a summary of the benchmark results.
Benchmark Tear Down Phase
Finally, JMH executes any methods annotated with @TearDown after the benchmark has completed. This can be used to release any resources or perform any necessary cleanup.
Setting up JMH
Before we dive into writing benchmarks, we need to set up JMH in our project. JMH can be easily added to your project by adding the following dependency to your Maven or Gradle build file:
| |
Writing a simple benchmark
To write a benchmark using JMH, we need to create a class and annotate it with @BenchmarkMode, @OutputTimeUnit, and @State annotations. The @BenchmarkMode annotation specifies the benchmark mode, the @OutputTimeUnit annotation specifies the time unit to use for reporting, and the @State annotation specifies the state of the benchmark.
Here is an example of a simple benchmark that measures the performance of adding two integers:
| |
In this benchmark, we have annotated the class with @State(Scope.Thread) to indicate that the state of the benchmark is local to each thread, @BenchmarkMode(Mode.AverageTime) to indicate that we want to measure the average time taken by the benchmark, and @OutputTimeUnit(TimeUnit.NANOSECONDS) to indicate that we want to report the results in nanoseconds.
The benchmark method is annotated with @Benchmark, which indicates that this is the method that we want to measure. In this case, we are measuring the time taken to add two integers.
Running a benchmark
To run a benchmark, we can create an instance of the org.openjdk.jmh.runner.Runner class and pass it the class that contains the benchmark. Here is an example of how to run the AddBenchmark class we just created:
| |
In this example, we have created an instance of the OptionsBuilder class and used it to specify the benchmark class that we want to run. We then create an instance of the Runner class and pass it the options we just created.
For further learning Jenkov has a great tutorial about it. https://jenkov.com/tutorials/java-performance/jmh.html